 listicle
Best Grow Lights for Indoor Seed Starting
Table of Contents
- Why Grow Lights Matter for Starting Seeds Indoors
- Full Spectrum LED vs. Fluorescent for Seeds
- Understanding Light Spectrum and Color Temperature
- Distance of Grow Lights from Seedlings
- How Long to Leave Grow Lights On for Seedlings
- Setting Up a Seed Starting Station with Proper Light
- Budget-Friendly Shop Light Options and Energy Efficiency
- Frequently Asked Questions
Last Updated: September 22, 2026
Why Grow Lights Matter for Starting Seeds Indoors
Starting seeds indoors under the best grow lights for indoor seed starting gives your seedlings the energy they need to thrive before transplanting outside. Without adequate light, seedlings become leggy, stretching tall and weak as they reach desperately toward whatever light source they can find. This happens because seedlings need intense, consistent light to fuel photosynthesis and build strong stems.
Even south-facing windows don't provide the light intensity seedlings demand, especially early in the season. Grow lights deliver the full-spectrum light seedlings need to grow compact, sturdy, and ready to handle outdoor conditions.
Setting up proper lighting doesn't require expensive equipment or complicated setup, just understand what seedlings need and how to deliver it.
Full Spectrum LED vs. Fluorescent for Seeds
The choice between LED and fluorescent lights comes down to efficiency, lifespan, upfront cost, and heat management. Both work for seedlings, but they deliver different trade-offs that matter depending on your setup and goals.
Fluorescent T5 Lights: Affordable and Reliable
Fluorescent T5 fixtures are the budget-friendly workhorse of seed starting. A basic 4-foot T5 fixture costs $15-30 and accepts standard cool-white bulbs ($5-10 each). They deliver reliable performance for seedlings and run cool enough to hang close without burning foliage.
The downsides: T5 fixtures use 40-50% more power than LEDs, bulbs last only 2-3 years, they generate heat that can accumulate in enclosed spaces, and tubes require special mercury recycling.
For a gardener starting a few trays of vegetables in containers, a single T5 fixture is often enough.
Full-Spectrum LEDs: Higher Initial Cost, Long-Term Savings
Full-spectrum LED grow lights cost more upfront, typically $40-80 for a quality seedling-focused fixture, but they deliver significant advantages over time.
Modern full-spectrum LEDs combine cool-white (5,000-6,500K) wavelengths for compact growth with red spectrum (620-750 nm) for root development, converting electrical energy more efficiently than fluorescents.
LED fixtures use 40-50% less electricity than fluorescents, paying for themselves within 2-3 seasons if you run multiple fixtures year after year.
LEDs generate minimal heat, raising temperature by 1-2°F versus 5-10°F for T5s, so you can hang them closer without heat stress. For container gardeners in small spaces, this is a real advantage.
Quality LED fixtures last 8-15 years, reducing replacement frequency and waste, with no mercury and full recyclability.
PAR and PPFD: Understanding Light Intensity
Both fluorescent and LED lights can deliver adequate light for seedlings, but the way they do it differs. PAR (Photosynthetically Active Radiation) measures the wavelengths plants actually use for photosynthesis (400-700 nanometers). PPFD (Photosynthetic Photon Flux Density) measures how many of these photons hit a given area per second, expressed in micromoles per square meter per second (μmol/m²/s).
For seedlings, aim for PPFD between 200-400 μmol/m²/s at leaf surface. A 4-foot T5 delivers roughly 150-250 at 6 inches; a quality LED delivers 250-400 at the same distance.
Simply follow distance guidelines and observe seedlings. Compact, dark-green growth with thick stems means adequate intensity; stretching or pale leaves means move lights closer.
Mississippi State University Extension recommends starting with what you have and upgrading gradually. For a few trays of vegetables, a basic T5 works fine. For permanent setups or container gardening, LEDs make more sense due to lower electricity bills, longer lifespan, and better heat management.
Both fluorescent and LED shop lights deliver excellent results at a fraction of specialty equipment costs.
Understanding Light Spectrum and Color Temperature
Light spectrum matters because different wavelengths trigger different plant responses. Seedlings thrive under cool-spectrum light, which encourages compact vegetative growth and strong root development.
Color temperature is measured in Kelvin (K). Here's what you need to know:
Cool white and daylight (5,000-6,500K) mimics spring sunlight and promotes sturdy, compact seedling growth with thicker stems and stronger leaf tissue, what you want for vegetables.
Warm white light (2,700-3,000K) triggers flowering and fruiting responses, save it for later in the season, not for seedlings.
For seed starting, stick with cool white or daylight spectrum fixtures. Your seedlings will thank you with compact, vigorous growth that translates to healthy transplants.
Distance of Grow Lights from Seedlings
Hanging lights too far away is a common mistake. Light intensity drops roughly 75% when you double the distance, making hanging height one of your highest-leverage decisions.
The Starting Distance Rule
Begin with lights about 3-4 inches above seedling leaves. This is close enough to deliver the intensity seedlings need without burning them. As seedlings grow taller, raise the fixture to maintain that 3-4 inch gap. This keeps light intensity consistent and prevents the stretching that happens when plants reach desperately toward a distant light source.
LED fixtures run cool and can hang 3-4 inches above foliage. Fluorescent T5 lights need 4-6 inches depending on wattage and room temperature. Standard shop lights fall in between at 4-5 inches.
Reading Your Seedlings for Clues
Stretching or leaning toward light means move closer. Bleached or papery leaves mean move back (light burn). Compact, dark-green growth with thick stems means you've found the sweet spot.
The Hand Test (and Why It Works)
A practical rule: position lights so you can barely fit your hand between fixture and seedling leaves. Your hand is roughly 3-4 inches thick, giving you a tactile reference point to check weekly.
Adjusting Height as Seedlings Grow
Raise your lights weekly, sometimes more often if seedlings are growing quickly. The goal is to maintain consistent light intensity as the plants get taller. If you don't raise lights, seedlings will eventually grow into them, and you'll lose the intensity benefit you worked to establish.
Use adjustable chains, S-hooks, or purpose-built light hangers so you can make small adjustments without tools. Some gardeners mark their chains with tape at 1-inch intervals so they can see at a glance how much they've raised the fixture over time.
Why Distance Matters More Than You Think
The inverse-square law of light means that small changes in distance create large changes in intensity. Moving a light from 4 inches to 6 inches reduces intensity by about 56%. This is why seedlings started under distant lights often look weak and pale even if they're not technically stretching, they're simply not receiving enough energy for vigorous growth. Conversely, keeping lights close (within the safe range for your fixture type) is one of the easiest ways to produce compact, sturdy seedlings that transplant successfully and establish quickly outdoors.
The Mississippi State University Extension recommends checking seedling height and light distance at least twice weekly during the germination and early growth phases. This habit takes 30 seconds and prevents most light-related problems before they become visible.
How Long to Leave Grow Lights On for Seedlings
Seedlings need 14-16 hours of light daily to develop strong, compact growth. This is called the photoperiod. Set your lights on a timer so they turn on and off automatically, consistency matters more than perfection. Maintaining this rigorous schedule ensures your plants remain healthy until they are ready for transplanting, at which point you should consider how organized seed storage solutions can help you manage your collection for the next season.
Most gardeners use 16 hours on and 8 hours off. This mimics long spring days and gives seedlings the energy they need without exhausting them. Seedlings do need darkness to rest and develop properly, so don't leave lights on 24/7.
The timing doesn't have to match sunrise and sunset. Set your timer for whatever works with your schedule, early morning to late afternoon, or mid-morning to late evening. Just keep it consistent. Seedlings adapt to whatever schedule you give them, as long as you stick with it.
One practical tip: use a simple plug timer from any hardware store. They cost a few dollars and take the guesswork out of daily on-off routines. You set it once and forget it.
Setting Up a Seed Starting Station with Proper Light
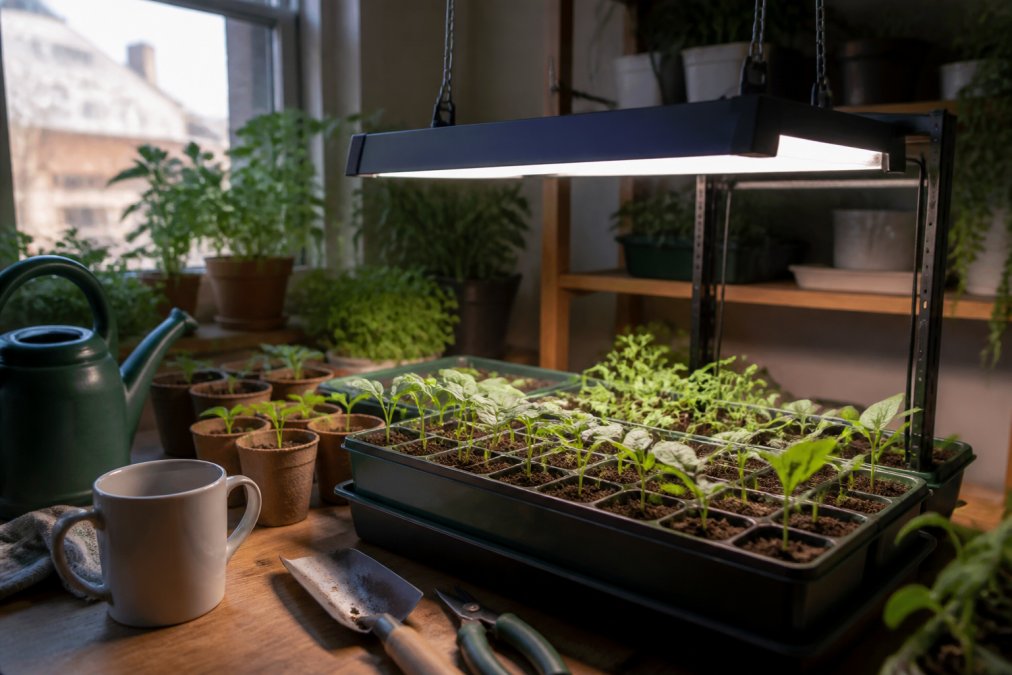
A functional seed starting station doesn't need to be complicated. You need three things: a sturdy surface, seedling trays, and adjustable lighting.
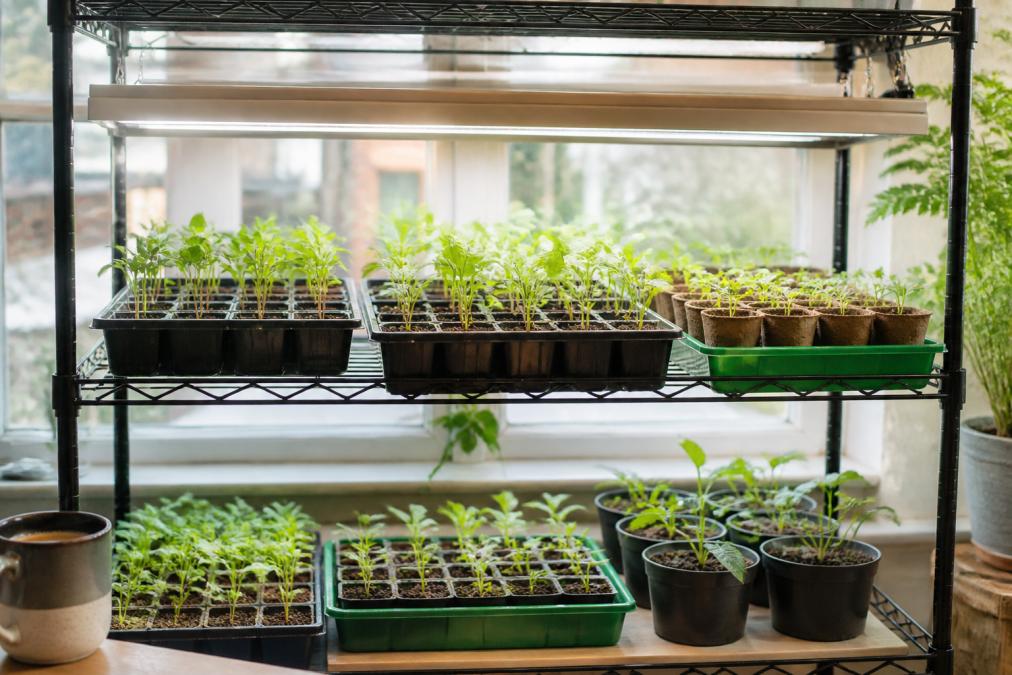
Start with a basic shelving unit or table. Wire shelves work well because they allow air circulation underneath. Arrange your seedling trays on the shelf, leaving space above for the light fixture.
Mount your lights on adjustable chains or brackets so you can raise and lower them as seedlings grow.
Heat Management and PAR/PPFD Considerations
Heat management becomes important in enclosed spaces like shelving units or plant carts. LED lights generate minimal heat, but fluorescents and enclosed spaces can trap warmth that stresses seedlings.
Budget-Friendly Shop Light Options and Energy Efficiency
You don't need specialized "grow lights" to start seeds successfully. Basic shop lights with T5 or LED bulbs work perfectly well and cost far less than branded grow light systems.
Frequently Asked Questions
Do seedlings really need specialized grow lights or can I use shop lights?
Standard shop lights with cool white or daylight fluorescent bulbs work well for seedlings and cost less than specialized grow lights. The key is matching the right color temperature (5000-6500 Kelvin) and positioning them close enough to provide adequate light intensity. Many home gardeners successfully use affordable T5 fluorescent fixtures. Specialized LED grow lights offer better energy efficiency and heat control, but budget shop lights deliver solid results if you monitor photoperiod and hanging distance carefully.
What color temperature (Kelvin) is best for vegetable seed starting?
Cool white or daylight bulbs between 5000-6500 Kelvin work best for seedlings. This color spectrum promotes compact, strong vegetative growth and prevents leggy seedlings that stretch toward the light. Avoid warm white (2700 Kelvin), which encourages flowering rather than leaf development. For a full-spectrum approach, combine cool white with a small amount of warmer light, but stick primarily to the cooler end of the spectrum during the seedling stage.
How far should grow lights be from my vegetable seedlings?
Start with lights 2-3 inches above seedlings for fluorescent fixtures and 6-12 inches for LED grow lights, depending on wattage and light output. Watch for signs of stress: if seedlings look bleached or leaves curl, raise the lights. If they become leggy and stretch upward, lower them closer. Adjust the distance as seedlings grow taller. The goal is to provide consistent light intensity without heat damage, and most home gardeners find a distance that works within the first week of adjustment.
Do I need to leave grow lights on for 24 hours a day?
No. A photoperiod of 14-16 hours per day is ideal for most vegetable seedlings. Seedlings still need a rest period to develop properly and conserve energy. Use a simple timer to automate on-off cycles, which also reduces electricity costs compared to continuous lighting. Starting with 14 hours daily works for most gardeners; some increase to 16 hours if seedlings appear weak, but 24-hour lighting often leads to stressed, unhealthy plants.